

Professional Vinyl Fence Installation Checklist: What to Expect & Verify
Short on time? Use this Vinyl Fence Installation Checklist guide to follow along while your fence is being installed by a professional crew—no DIY steps, just the standards, checkpoints, and questions homeowners should use to keep the job on track.
Before Work Begins: Pre-Install Essentials (Your Red-Flag Filter)
Site survey & layout
The crew confirms property lines, corner points, and gate swing/clearances.
Marked utility locates (811/JULIE in Illinois) are visible; trenching or post hole diggers never cross unmarked ground.
A simple string-line layout shows straight runs, step/rack plan for slopes, and gate locations.
Permits & approvals
If your municipality or HOA requires it, the contractor handles permits and any drawings.
You’re told which setbacks/height limits apply (front vs. side/rear yards).
Material verification
You see the profile/spec of posts, rails, and panels (privacy vs. semi-privacy).
For wind-exposed lots (alleys/corner lots common around Chicago), the proposal specifies rail reinforcement(aluminum inserts or equivalent) and recommended post size.
Hardware schedule lists hinges, latches, drop rods, handles, and locks by type.
Written scope & warranty
Scope shows linear feet, heights, gates, post depth, demo/haul-away, restoration (soil/seed).
Manufacturer and installer warranties are provided in writing.
Groundwork & Post Setting: The Foundation You Don’t See but Will Feel Later
Holes & depth
Post holes are consistent and deep enough for local frost line and wind exposure (pros will state a typical depth target and adjust for soil).
Holes are kept clean (no loose fill) before setting.
Concrete setting
Posts are plumb and aligned from two directions against string lines.
Concrete is properly consolidated around the post and slightly domed at grade to shed water; no exposed voids.
Corners, ends, and gate posts often receive larger or deeper footings than line posts.
Spacing & expansion
Post spacing matches panel specs so rails lock in without forcing.
Installers allow thermal expansion gaps per the manufacturer—no “jammed tight” rails that could buckle.
Slope strategy (pick one, plan it)
Racking (rails follow grade) for mild slopes; or
Stepping (tiered panels) for steeper sections, with clean grade transitions at each post.
Rails, Panels & Privacy: The Part You’ll See Every Day
Rail reinforcement & locks
Long runs and wind corridors get reinforced bottom rails; gates get reinforced top/bottom rails.
Rails seat fully in routed posts or brackets; lock tabs/screws match manufacturer guidance.
Panel alignment
Top lines are straight and consistent; reveals/gaps are uniform from post to post.
For semi-privacy designs, spacing is even and visually true from multiple angles.
Color & finish protection
No grinding/metal cutting over panels (avoids rust specks).
Installers keep abrasive tools/brushes away from the vinyl face; scuffs are spot-cleaned before handoff.
Gates & Hardware: Where Most Problems Start (and Can Be Prevented)
Gate posts & hinges
Gate posts are stiffer (larger or sleeved) and set deeper when specified.
Hinges are rated for gate width and weight; tension/self-close features are set to hold a latch reliably.
Latch alignment & security
Latch strike engages cleanly without lifting or slamming.
Child-safe or lockable latches are offered for pools/yards; drop-rods align with a ground receiver on double gates.
Clearances
Gates swing without rubbing grade or heaving on winter frost.
On alleys/driveways, bottom clearance accounts for snow, gravel, and vehicle angles.
Corners, Ends & Transitions: The Details that Signal Craftsmanship
Corner posts are braced (when required) so angle joints don’t wander.
End posts are anchored with the same care as corners; no “light” footing at the last panel.
Transitions to existing fence or building are finished with appropriate brackets, sleeves, or trim—no raw edges.
Clean-Up & Finishing: The Professional Touch
All concrete spoils, box debris, and sawdust are removed.
Soil at post holes is leveled, tamped, and (if in scope) seed/straw applied.
Caps are installed and seated—adhesive used where the manufacturer recommends.
Surfaces are wiped down; panels are free of stickers, pen marks, or transport residue.
Final Walk-Through: Your Punch-List (Print or Save This)
Use this vinyl fence installation checklist with the crew lead before final payment:
Lines & level: Sight down the top line—no waves or dips.
Plumb posts: Randomly check a few with a level.
Gates: Open/close 10×—no binding; latch catches every time.
Hardware: Hinges, latches, drop-rods tight; no sharp edges.
Corners/ends: Firm, no wobble.
Rails: Reinforced where promised; expansion gaps present.
Cleanup: Debris removed; grade restored.
Documents: Warranty, care/cleaning sheet, and as-built lineal footage.
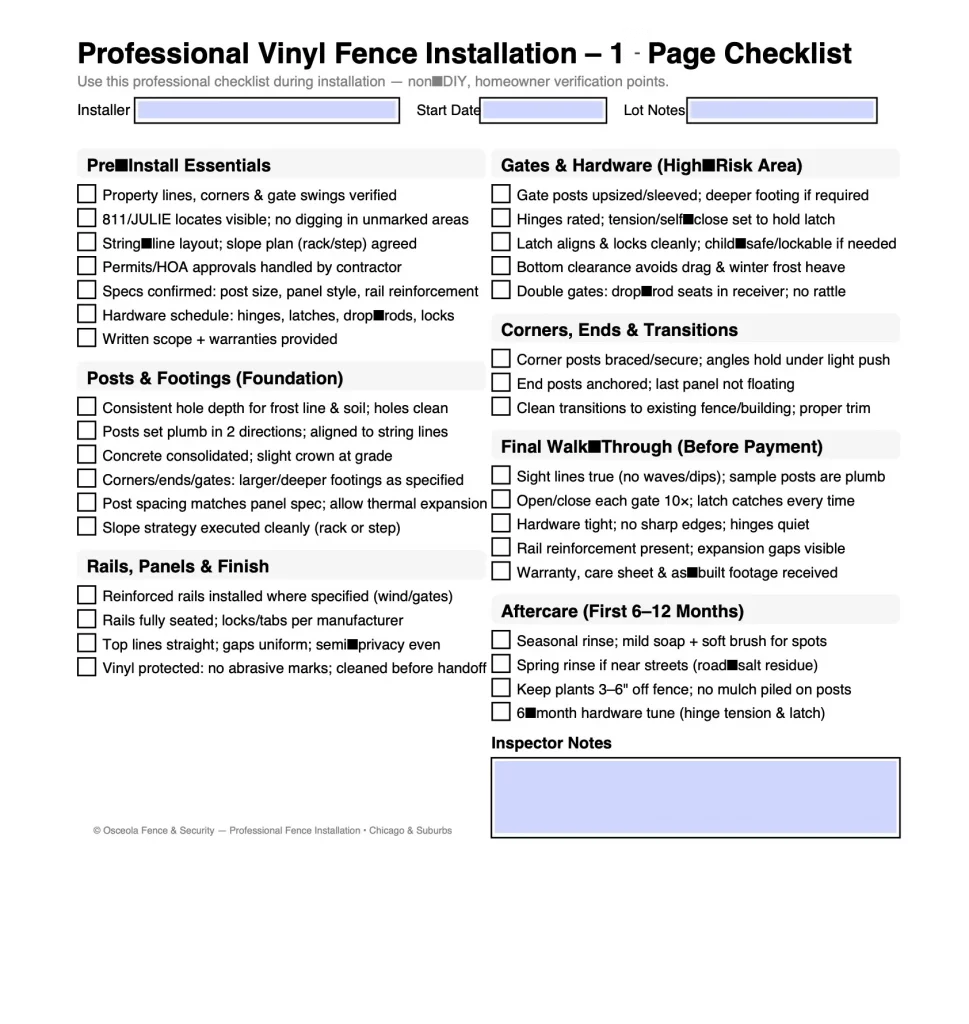
Download Image: Vinyl Fence Installation Checklist
Aftercare (So Your New Fence Stays New)
Rinse dust/pollen seasonally; spot clean with mild soap and soft brush.
Near streets (road salt in winter around Chicago), do a spring rinse to remove residue.
Keep plants 3–6″ off the fence for airflow; avoid piling soil/mulch against posts.
Schedule a 6-month check for gate tension and latch alignment.
Want the full routine? See our Essential Vinyl Fence Maintenance Guide and Seasonal Care for Vinyl Fences.
When to Ask for a Revisit (Common Fixes Under Warranty)
Gate sag or latch misalignment after first heavy rain/freeze
Caps that lift or rattle
Panels that develop a visible wave in high-wind areas
Hardware loosening or unusual squeaks/grinds
A reputable fence installer will tune hardware and re-seat caps as part of early-life service.
Ready for a professional installation?
Get a layout, post plan, and hardware schedule tailored to your lot.
If you’re looking for a Vinyl Fence Near Me remember that a well-installed fence can last for years.
Get a Free Estimate for Vinyl Fence Installation →
Carlos Cooper is a Project Manager at Osceola Fence & Security with 10+ years overseeing residential, commercial, and industrial installs across Chicago and the suburbs. He specializes in fencing systems, wind-rated posts, and gate hardware, coordinating permits and inspections to keep projects on schedule.
- Led HUNDREDS of field installations; expert in post depth, rail reinforcement, and slope strategies (rack/step)
- Gate reliability: hinge tensioning, latch alignment, and double-gate drop-rod setup
- Credentials: OSHA-10 certified • Manufacturer training: FENCING_SYSTEMS_TRAINING (2025)
Questions about your project? Contact our team for vinyl fence installation in Chicago.